It is pain in the neck to deal with Help Viewer cache when developing your Help documents. After updating your indexes with Help Indexer, you may find Help Viewer refusing to open your Help Documents, links do not work, or show empty pages. This happens because more often than not the version number of your help document in the plist is not bumped up.
To fix this problem, I wrote the following bash script to clear several cache repositories Help Viewer and Help Indexer is using.
Create a text file using the text editor pico from the command line:
pico ./hvfix
Edit your text file, then save on exit:
rm -rf ~/Library/Caches/com.apple.help*
rm -rf ~/Library/Preferences/com.apple.help*
rm -rf ~/.Trash/*
killall helpd
defaults write com.apple.helpindexer IndexAnchors YES
Before you run the script make sure to give executable permissions to your script like this
chmod +x hvfix
./hvfix
Then run your script:
./hvfix
This script also automatically sets "Index anchor information in all files" checkbox (which is normally needed for anchor indexing) before you run the Help Indexer next time.
Thursday, June 16, 2011

Friday, February 18, 2011
How to detect memory leaks in OS X Applications
In this tutorial I am going to demonstrate how to detect memory leaks in your OS X applications. We are going to use XCode development environment and Instruments tool that comes with XCode.
1. Put a break point at the end of your application. In this example we have a simple application called Prog1 which we set to deliberately leak memory. Note the commented out line that would cause a 16 byte memory leak:
//[aFraction release]:
2. Run the application in Debug mode and let it stop at the breakpoint.
3. Meanwhile locate the tool called Instruments under Developer/Applications and run it.
4. Select the template called Leaks and press Choose.
5. This will bring up a panel with Allocations and Leaks Instruments.
6. Select Leaks instrument by clicking on it.
7. Click Target selector on top left and choose the option Attach to Process.
8. From the drop down menu of running processes choose your application by name (eg. Prog1)
9. Press the red Record button on top left. This will start a memory leak detection session.
10. When leaked objects are listed press the red button again to stop.
11. The first line reporting 128 bytes leak is a false alarm it has nothing to do with your application. All Cocoa applications leak 128 bytes. Some argue this is an Apple bug that needs to be fixed.
12. The rest in the listing are your applications' memory leaks. The neat thing is your leaked object's type is given, in this case the class Fraction and how much it leaked.
1. Put a break point at the end of your application. In this example we have a simple application called Prog1 which we set to deliberately leak memory. Note the commented out line that would cause a 16 byte memory leak:
//[aFraction release]:
 |
| Cick to enlarge |
3. Meanwhile locate the tool called Instruments under Developer/Applications and run it.
4. Select the template called Leaks and press Choose.
 |
| Click to enlarge |
5. This will bring up a panel with Allocations and Leaks Instruments.
6. Select Leaks instrument by clicking on it.
 |
| Click to enlarge |
7. Click Target selector on top left and choose the option Attach to Process.
8. From the drop down menu of running processes choose your application by name (eg. Prog1)
9. Press the red Record button on top left. This will start a memory leak detection session.
10. When leaked objects are listed press the red button again to stop.
11. The first line reporting 128 bytes leak is a false alarm it has nothing to do with your application. All Cocoa applications leak 128 bytes. Some argue this is an Apple bug that needs to be fixed.
12. The rest in the listing are your applications' memory leaks. The neat thing is your leaked object's type is given, in this case the class Fraction and how much it leaked.
Monday, January 25, 2010
$PATH tips
Extending your $PATH using the editor pico:
pico ~/.profileAdd these lines
PATH=/usr/local/Trolltech/Qt-4.6.1/bin:$PATH
export PATH
Saturday, September 19, 2009
Setting Up a Repository
To setup an SCM repository on Mac:
mkdir -p /Users/Shared/Subversion/MyProject
cd /Users/Shared/Subversion
Make sure the repository will be readable, writeable, and listable for all users:
svnadmin create MyProject
chmod -R a+rwX .
ls -l MyProject
Create subversion configuration directory:
ergun-coruhs-imac:Subversion ergun$ svn status
svn: warning: '.' is not a working copy
ergun-coruhs-imac:Subversion ergun$
mkdir -p /Users/Shared/Subversion/MyProject
cd /Users/Shared/Subversion
Make sure the repository will be readable, writeable, and listable for all users:
svnadmin create MyProject
chmod -R a+rwX .
ls -l MyProject
Create subversion configuration directory:
ergun-coruhs-imac:Subversion ergun$ svn status
svn: warning: '.' is not a working copy
ergun-coruhs-imac:Subversion ergun$
The default configuration file is now at .subversion/config in your home directory. You must edit config file to exclude binary files (such as build/*) out of SCM repository. However .subversion is a hidden folder. You must make .subversion folder visible first to locate and edit the config file.
Inside config file, uncomment this line, and add the following wildcards to exclude them from SCM:
global-ignores = ... build *.nib *.so *pbxuser *.mode *.perspective
Uncomment this line:
enable-auto-props = yes
Add these to the [auto-props] section at the end of the config file:
*.mode* = svn:mime-type=text/X-xcode
*.pbxuser = svn:mime-type=text/X-xcode
*.perspective* = svn:mime-type=text/X-xcode
*.pbxpoj = svn:mime-type=text/X-xcode
Inside config file, uncomment this line, and add the following wildcards to exclude them from SCM:
global-ignores = ... build *.nib *.so *pbxuser *.mode *.perspective
Uncomment this line:
enable-auto-props = yes
Add these to the [auto-props] section at the end of the config file:
*.mode* = svn:mime-type=text/X-xcode
*.pbxuser = svn:mime-type=text/X-xcode
*.perspective* = svn:mime-type=text/X-xcode
*.pbxpoj = svn:mime-type=text/X-xcode
Save and exit.
Showing hidden files in Mac
Launch Terminal, and run these commands
defaults write com.apple.finder AppleShowAllFiles TRUE
killall Finder
Entering the two lines above into Terminal will allow you to use the Finder to display all of the hidden files on your Mac. The first line tells the Finder to display all files, regardless of how the hidden flag is set. The second line stops and restarts the Finder, so the changes can take effect. You may see your desktop disappear and reappear when you execute these commands; this is normal.
defaults write com.apple.finder AppleShowAllFiles TRUE
killall Finder
Entering the two lines above into Terminal will allow you to use the Finder to display all of the hidden files on your Mac. The first line tells the Finder to display all files, regardless of how the hidden flag is set. The second line stops and restarts the Finder, so the changes can take effect. You may see your desktop disappear and reappear when you execute these commands; this is normal.
Thursday, June 18, 2009
Target-Action Design Pattern
The target-action approach to event-driven systems allows for a much greater deal of dynamism when compared to other, more static approaches, such as by subclassing. That is because subclassing is a relatively stiff way of programming - the programmer has to lay out the internal interconnection logic of a program at design time and this cannot be changed later (unless the program is stopped, reengineered and built again). On the other hand, target-action based programming can change these completely at run-time, thus allowing the program to create new inter-relationships and completely novel behavior all by itself.
A prime example of this approach is the OpenStep API, which partly thanks to being based on the dynamic Objective-C language, has much of its graphical user interface implemented by using the target-action paradigm. Consider the following example (written in the Objective-C language):
[button setTarget: self];[button setAction: @selector(doSomething)];
Now when the button identified by the button variable is pressed, the runtime system will try to send a message named doSomething to the object in which this code has been invoked. It is also very well possible to determine the message to be sent at run-time:
[button setTarget: self];[button setAction: NSSelectorFromString([textField stringValue])];
Here the message which is to be sent is determined by consulting a text field's string value (the string of text which the user typed into a text field). This string is afterwards converted into a message (using the NSSelectorFromString function) and passed to the button as its action. This is possible because, under Objective-C, methods are represented by a selector, a simple string describing the method to be called. When a message is sent, the selector is sent into the ObjC runtime, matched against a list of available methods, and the method's implementation is called. The implementation of the method is looked up at runtime, not compile time.
Tuesday, June 16, 2009
Cocoa Data Overview
The Core Data framework provides generalized and automated solutions to common tasks associated with object life-cycle and object graph management, including persistence:
Subscribe to:
Posts (Atom)
How to recover from Mac Book Pro catastrophes
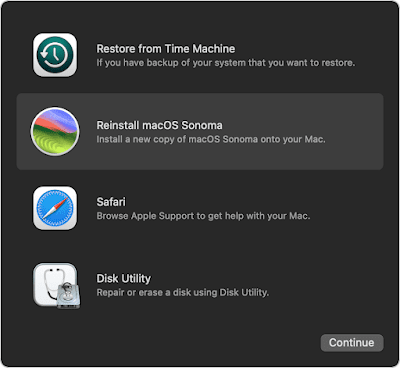
Synopsis DISCLAIMER: This article applies to Intel based MacBook Pro 4th generation models with a Touch Bar (2006-2020.) The methodology giv...
-
It is pain in the neck to deal with Help Viewer cache when developing your Help documents. After updating your indexes with Help Indexer, yo...
-
 Problem There are two problems when you close sessions and windows in ITerm2. When you gracefully exit from ITerm2 sessions with a recommen...
 -
In this tutorial I am going to show you how to build a secure website using: AWS Elastic Beanstalk With Elastic Beanstalk, you can quick...