Synopsis
DISCLAIMER: This article applies to Intel based MacBook Pro 4th generation models with a Touch Bar (2006-2020.) The methodology given in this article may not directly apply to earlier models and may be different for Apple Silicon models.
There are many ways your MacBook Pro may get corrupted. As a result you may not be able to reboot or login.
What do you do?
In this article I will outline a general approach on how to recover your MBP laptop from catastrophic failures. Then I'll describe specifically what worked for my usecase.
More reading: Mac Book Pro (Wikipedia)
Preventive measures against disaster scenarios
- User data (non-recoverable); for example, photos, documents, scans, tax documents, and anything deemed to be private .
- Application data; for example, installed applications.
- Hardware; i.e. your Mac Book Pro.
- Make sure your data are backed up consistently (automatically) either in the Cloud or using Time Machine. This way you will always have a good latest snapshot of your data. For example I backup my Macintosh HD using Time Machine on an external SSD drive, an APFS (Encrypted) formatted volume which is set to trigger backup every hour.
- Ideally external backup SSD drives should further be backed up and physically stored securely offsite against natural catastrophes such as fires, flooding, or theft. Even if you don't implement offsite storage, make sure your user data are not just stored on an external drive but on a cloud location as well.
- Backing up private user data is more crucial than applications. You can almost always recover applications once your system is back. For example I have another external SSD APFS (Encrypted) volume synchronised with Dropbox Cloud where I keep my most critical private user data.
- Against theft, make sure Macintosh HD and all external SSD drives are APFS (Encrypted) formatted with password protection, and the password is known by another trusted person at all times. This means the external SSD drives and Macintosh HD has no use for others if they are stolen or lost.
- Make sure FindMy application can find your laptop in case you lost it and you want to erase it remotely to mitigate attempts of sensitive data theft.
Recovery process
- You erased Macintosh HD remotely against data theft because you had physically lost it. But then you found it and everything was erased.
- You corrupted the system in such a way that you cannot login. This can happen if you mess up with user accounts, Unix permissions, or when disk corruption occurs.
- Start up from macOS Recovery procedure can be different depending on if your machine is Intel based or Apple Silicon. Make sure the read on above link carefully.
- Whatever the recovery key option you press and hold, on Intel machines you need to wait until the Apple logo appears in order for the designated action begins.

How I fixed my problem
CAUTION: ChatGPT is a great AI tool. But beware, it can hallucinate and give you wrong answers. Always verify the information with a second method (eg. Google.)
Startup key combination
Attention: there are subtle differences between startup key combinations. For example I tried rebooting with Command-S and login but that didn't work. Later I discovered on theMac startup key combinations page this feature was disabled on macOS Mojave or later."
If you have another Mac (in good working condition) you can connect to the troubled machine using Target mode.
I connected my working MacBook Pro (mid-2014 BigSur) and rebooted the 2018 machine with T key (Target mode.) In this mode I could see the contents of the 2018 machine from the 2014 one.
Target mode can be useful if you want to copy user data from the corrupt target before you erase its contents.
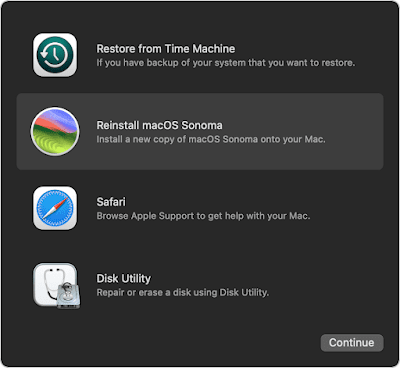
To fix my problem I booted the target in Recovery mode with Command-R (until Apple icon appears), then I erased the Macintosh HD using the Disk Utility option. After that I reinstalled macOS Sonoma using the relevant option.